Recent Articles

Make Blogging Easy and Freedom of Creating Websites.

The Main goal of our website is Make blogging easy and understandable for users so anyone easily create website and Blogs .

Clear the Burden from Mind

Just put keyword in search box and search speedly.There is no burden of Searching from Books

Easily Searchable For users

It is easy to search and find information from our website.Just put Keyword and see result.

How to Make money Online?

It is one of the question which ever round in mind while using internet.Find Free Methods of Making Money Online in our Website.

Advertising tips and Advertising on Our site

Advertise on our website and Find tips for Advertising and Publishing Network

Showing posts with label Adsense. Show all posts

Turn out mag


 Downloads:2013

The template comes with so many built in features including:
» Thumbnails on homepage (automatic)
» Two main columns on the Homepage (Mag style)
» Banner ad / Adsense ready
» 468 x 60 px Banner ad on the header
» Three Columns
» Search Box
» SEO Optimized
» "Read More.." (automatic summarize)
» Featured Video
...and many more...


Step by Step Installation Guide:

(First backup your current template file before installing any new template)


Step 1: Go to Settings » Formatting and select the Date Header format like the one shown below and Save the changes.

 Step 2 : Editing the top Navigation links:

Edit the Nav linksJust go to Layout » Edit html
and Look for this code:


<li><a href='http://bloggertricks.com'>Blogger Templates</a></li>

<li><a href='http://bloggertricks.com'>Blog Tips</a></li>

<li><a href='http://wpthemedesigner.com'>WP themes</a></li>


Just look at the code.. You'll understand. Got it? Just replace the Anchor text (Blogger Templates, Blog Tips, WP themes ) with the corresponding links.

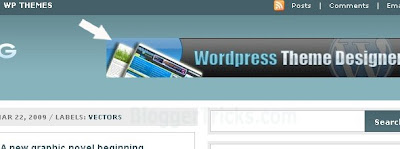
Step 3: You can add 468 x 60 px Adsense ad on Right side of Header:

Adsense ad on header
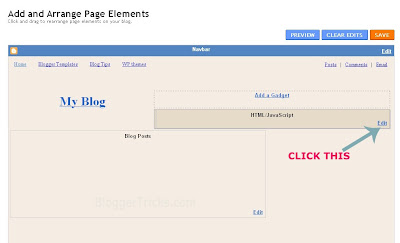
Just go to Layout and click on "Edit" of the header widget as shown in the pic below:

adsense adand paste you adsense code in the box and Save it.

Step 4: Editing the Logo:

editing logo

The .psd file of the Header logo is included in the download file. Open it with Photoshop and edit the Site Name and description and Save it as image file (.jpg)
Next, upload the image to any image hosting services like Photobucket, Tinypic,etc and after uploading, they will give you a direct link to that image file.

Go to Layout » Edit html and find this image url in the template code..

http://i44.tinypic.com/24exqxd.jpg


and replace it with the one you uploaded and Save the template.
(If you don't know editing the .psd file or If you don't have photoshop, just leave a comment here with your Sitename and description, I'll do it for you..)


Now your Mag style template is successfully installed... Congrats :)

Like the template ? or Have any questions ? Comment here...


---------------------------------------------
Answers to Reader comments:

Question: hi! how about the feed in the upper left corner, how can I edit that? thank you!!! (by weng cariyaga)

Answer: To edit the feed url, just find this

<a expr:href='data:blog.homepageUrl + &quot;feeds/posts/default&quot;'>Posts</a>


and change it to like this


<a href='http://YOUR-FEEDBURNER-URL.com'>Posts</a>


Don't forget to edit the YOUR-FEEDBURNER-URL with your feed address..


Question:
can you please tell me where to add a "share this" or "Addthis" button, and also a Digg button. I want the "share this" button to appear at the end of the post and the "Digg" with submission capability at the top on the main post page. thanks a lot in advance.

To add Sharethis/add this button on the homepage:

preview after adding addthis widget

First go to addthis.com and select the button shown below and get the html code for that button.

share this

Next, go to Layout » Edit html and find this code
<a href="data:post.url">Read More</a>
and replace it with this

<a href="data:post.url">Read More</a> / YOUR ADDTHIS CODE

To add on the Post pages:
Find this..

<div id="contentb">


<div class="single">

<h2><data:post.title></data:post.title></h2>

<div class="contentb"><p><data:post.body></data:post.body></p>

</div>

</div>


and add your ADDTHIS code below those lines
The digg option is already there in the sharethis widget..so, if you add digg button again,the homepage looks crappy.

Simple blogger template


                                                                       Download

This new addition is a three column red and white Blogger template for those looking for a very simple look. It’s like getting an empty canvas and now it’s your chance to paint it however you want.
The right sidebars come with your standard widgets as well as some additional custom ones. a2zproblogspotcom.tk Templates has added the cool real time FeedIt traffic widget, a Text Link Ad ad placeholder, and an Google AdSense placeholder which just needs your publisher id entered.
If you don’t already have an AdSense account, you should sign up for one now for free so you can start making money on your blog.
There’s also a hardcoded Google AdSense link unit put into the top area above your first post. This is a great spot to get clicks so you should update it with your own publisher id. It’s not a widget so you’ll have to edit the template code and look for the following tag<!-- start top google ad block -->and<!-- end top google ad block -->. That’s the section you can change.
You’ll notice that the code looks a little strange. That’s because it needs to be converted in order for Blogger to recognize it. Once you create your new AdSense code you can convert it using our free Ad Code Converter and then paste it into your template.

PassionDuo Green Template


Here is the third and final version of our latest make money blogger template first converted here at a2zproblogspotcom.tk. This amazing PassionDuo template for Blogger comes in three colors: red, blue, and now green.
This template includes several popular ad formats for your blog. You get a 468 x 60 banner spot in the header, six 125 x 125 banner spots in the right sidebar, and plenty of other sidebar spots for skyscraper banners.
We’ve also included our popular sidebar widgets such as Recent Posts, Recent Comments, and the cool Feedjit (real time visitor widget). Just paste in your blog rss feed urls into the Recent Posts & Comments widgets and they’ll start working.
Unlike most other custom make money blogger templates, we’ve taken the extra step and setup the “Fonts & Colors” functionality. That means you can change all the colors and font styles easily by just using the built in Blogger section. We’ve also customized the comments section so it looks very professional as well.
PassionDuo also includes top tabs which can be added via your Blogger page element screen. The rss feed icon will automatically appear once you add your first tab so don’t be alarmed after you first install it.
Configuring the rest of this template is actually quite easy. You can swap out the ads and replace them with your own or feel free to keep the existing ones if you don’t have any to use. Make sure you check the “Expand Widget Templates” checkbox on the “Edit HTML” page within Blogger before trying to make any edits. Also make sure to backup your old template just in case you make a mistake.
Let’s start with the 468 x 60 header banner. Search for “<!-- Delete or replace with your ad --> in the template code and the first one you come across is where you replace the ad.
The second instance of <!-- Delete or replace with your ad -->” is for the Google AdSense code which you can either keep, replace, or just remove completely.
For the six 125 x 125 banner ads you’ll need to find <!-- Replace with your ads --> and update those one by one. Make sure not to delete the <li> and </li> before and after each ad otherwise it will look funny. If you don’t already have ads to use, I recommend clicking through each banner and become an affiliate. Then you can replace the affiliate codes with your own and start making money!

Falkenpress

FalknerPress Blogger Template
                                                                     Demo | Download

Main Features:
* Automatic Thumbnails on posts
* Automatic Post Summarize
* Featured Content Slider
* Adsense ready
* PSD Custom Logo Included
* Youtube Video embedding Integrated
* Fully SEO Optimized
* Advertisement Block Ready
* 3 Columns
* Social Bookmarking Icons
* Twitter Updates widget
* Feedburner Email Subscription ready
* Thumbnails on Recent Posts in Sidebar
* Integrated Search box
* Beautiful top Navigation bar
* Cross-browser compatible
* and many more....

Step by Step Installation Guide:


(Make sure you backup your current template before installing any new template)
.

Step 1 : Edit the Logo

Edit the logoThe logo *psd (photoshop) file is included in the download file. Open it with Photoshop and Edit the logo and Save it in .jpg format.
Next, upload that image to some image host like tinypic, photobucket,etc.. and get the image link to that file.
Help : Don't have photoshop ? or don't know how to edit the logo ? Leave a comment here with your site name.. I'll make it for you..
If you want the logo quickly.. Post your request here. I'll quickly help you out!

Go to Layout » Edit html
Find this url

https://blogger.googleusercontent.com/img/b/R29vZ2xl/AVvXsEjFZ9lgOgKEGmOWeviec94ksYmAZvF2uOHuX9N0wWkWrtxH0kAU8I0td3fUCmvzLjsJowRlEVoPNfcBUifcp3_vhq0tQx5m_XV2D04Z7MIYOm2DJZbRSYPvc3zY5umDeOoKKm245U0uzVOh/

and replace it with your image url.

Step 2 : Edit the top Navigation links

edit the top navigation links
Go to Layout » Edit html and find this code

<ul>

<li><a expr:href='data:blog.homepageUrl'>Home</a></li>

<li><a href='WEBSITE URL HERE'>About</a></li>

<li><a href='WEBSITE URL HERE'>Archives</a></li>
<li><a href='WEBSITE URL HERE'>Contact</a></li>


<li><a href='WEBSITE URL HERE'>Disclaimer</a></li>


<li><a href='WEBSITE URL HERE'>Forum</a></li>


<li><a href='WEBSITE URL HERE'>Subscribe</a></li>


<li><a href='WEBSITE URL HERE'>History</a></li>


<li><a href='WEBSITE URL HERE'>Profiles</a></li></ul>


See the pattern..you can easily understand. Simply replace the WEBSITE URL HERE with your target url. Also, Edit the anchor texts to your liking (About,Archives,Contact,etc)

Step 3 : Edit the Latest Twits

Latest Twits widget
If you use twitter, You can use the integrated twitter twits widget. Simply find this


<a href='http://twitter.com/
a2zproblogspot' id='twitter-link' style='display:block;text-align:right;'>follow me on Twitter</a>

</div>

<script src='http://twitter.com/javascripts/blogger.js' type='text/javascript'/>

<script src='http://twitter.com/statuses/user_timeline/a2zproblogspotcom.tk.json?callback=twitterCallback2&amp;count=1' type='text/javascript'/>


and replace
a2zproblogspotcom.tk with your twitter id.

Don't use Twitter...? then simply delete this code from the template.

From...

<b:widget id='HTML5' locked='false' title='Twitter' type='HTML'>

...................

...............

<script src='http://twitter.com/statuses/user_timeline/
a2zproblogspot.json?callback=twitterCallback2&amp;count=1' type='text/javascript'/>

</div>

</div>

<b:include name='quickedit'/>

</b:includable>

</b:widget>


Step 4: Edit Feedburner Email subscription and Feed count Button

Edit Feedburner Email subscription and Feed count ButtonThis is another cool feature in this template.. built in Email subscription form and Feed count button.

Search for this line


http://feedburner.google.com/fb/a/mailverify?uri=
a2zproblogspotcom.tk

and next, this line


<p><a href='http://feeds2.feedburner.com/
a2zproblogspotcom.tk'><img alt='' height='26' src='http://feeds2.feedburner.com/~fc/a2zproblogspotcom.tk?bg=FD6D00&amp;fg=202931&amp;anim=1' style='border:0' width='88'/></a></p>

and Edit those urls to your feedburner links.
Don't have Feedburner yet ? You can signup here.

Step 5 : Add Youtube Video

Add Youtube Video

Go to Layout tab.. and you can see like this

Click on the edit and add your youtube code

Click on the edit button and paste your youtube video code.
Don't forget to change the width and height of the video to 250 x 190 px to fit perfectly in the layout. You can edit the width and height values in the youtube embed code.
Help: How to add Youtube videos to Blogger

Don't want Youtube Video Widget ? then, simply remove this code from the template.


<b:widget id='HTML2' locked='true' title='VIDEO (250 x 190)' type='HTML'>

<b:includable id='main'>

<!-- only display title if it's non-empty -->

<data:content/>

<b:include name='quickedit'/>

</b:includable>

</b:widget>

Step 6 : Setup Mini Updates (Recent Posts with thumbnails)

This template has inbuilt Recent Posts with Thumbnails widget. All you have to do is enter your blog url and it will do the rest.
Look for this code in the template

Mini Updates


home_page = &quot;http://
a2zproblogspotcom.tk/&quot;;

and replace the url with your Blog url.

Step 7 : Edit Social Bookmarking links

Be my Friend?

In the footer, you will see three widgets, 1.About me 2. Be my Frined? and 3. Advertisement widget.
The 1 & 3 widgets can be directly added by going to Layout tab.
All you need to edit is the second widget 'Be my Friend'. Using Social Bookmarking sites is a smart way to drive traffic to your sites.. So, if you don't have any of those accounts, Just take time to register..they are free and worth it :)

Find these lines:

<ul>


<li><a href='http://your-feedburner-url.com' target='_blank'>Subscribe</a></li>


<li><a href='http://digg.com/users/
a2zproblogspotcom.tk' target='_blank'>Digg</a></li>


<li><a href='http://www.facebook.com/people/
a2zproblogspotcom.tk' target='_blank'>Facebook</a></li>


<li><a href='http://
a2zproblogspot.stumbleupon.com'>Stumble It!</a></li>


</ul>


</div>

<div class='share-list2'>


<ul>


<li><a href='http://technorati.com/faves?add=http://your-blog.blogspot.com/'>Technorati</a></li>


<li><a href='http://twitter.com/
a2zproblogspot' target='_blank'>Twitter</a></li>


</ul>


and Edit them accordingly.

Step 8 : Featured Content Slideshow

Featured Content Slideshow

Edit the Slideshow...
Go to Layout » Edit html and find these lines..
Observe the pattern, it's easy!
wait! First prepare your images... the images should be 490(width) x 280 (height) pixels. Use Photoshop or any other image editing software to crop the images to 490 x 280 px and then upload the images to some image host like photobucket,tinypic,etc.

Next, find this code

<div id='myGallery'>

<!-- First Picture Start -->

<div class='imageElement'>

<h3>Title One </h3>

<p/>

<a class='open' href='http://
a2zproblogspotcom.tk'/>

<img alt='Marley And Me' class='full' src='IMAGE URL'/>

<img alt='Marley And Me' class='thumbnail' src='http://54800.com/wp-content/uploads/a1.jpg'/>

</div>

<!-- First Picture End -->

.........................................

..........................................

</div>


The pattern is like this

<div id='myGallery'>


<!-- First Picture Start -->


<div class='imageElement'>


<h3>Title 1 </h3>


<p/>


<a class='open' href='LINK 1 '/>


<img alt='Marley And Me' class='full' src='URL OF IMAGE 1 '/>


</div>


<!-- First Picture End -->


<!-- Second Picture Start -->


<div class='imageElement'>


<h3>Title 2 </h3>


<p/>


<a class='open' href='LINK 2 '/>


<img alt='Marley And Me' class='full' src='URL OF IMAGE 2 '/>


</div>


<!-- Second Picture End -->


<!-- Third Picture Start -->


<div class='imageElement'>


<h3>Title 3 </h3>


<p/>


<a class='open' href='LINK 3 '/>


<img alt='Marley And Me' class='full' src='URL OF IMAGE 3 '/>


</div>


<!-- Third Picture End -->


</div>


Got it? Now edit those links and Save the Changes!!
Now, FalknerPress template is successfully installed!

Extras

Here are few more things you can learn about this template..
Adsense Color Codes:

Here is the Color Palattes you can use to perfectly blend your adsense ads in the layout

1. Adsense in Left sidebar:
Preview:

Adsense in left sidebar


Colors to use:

left sidebar colors


2. Adsense in Right sidebar:

Preview:
Adsense in right sidebar

Colors to use:

Right sidebar colors

3. Adsense just below Featured Content Slideshow:
(468 x 60px)

SAME COLORS as 2nd one


4. Adsense in Footer:
Colors to use:

Colors to use in footer


That's it guys! Hope you like the template :D

Like the template? or If you have any questions ? Comment here...

Twitter Delicious Facebook Digg Stumbleupon Favorites More